
As featured in...


For the first time ever, get access to the secret “bible” I’ve used to personally guide thousands of customers to consistent 3D printing perfection - for years.
Like this finely detailed ABS print, which prints perfectly without warp or layer separation.


Or an entire bed of these PETG parts that didn’t show a hint of stringing or surface imperfections.
And just this beautiful PLA extrusion. Or even some Nylon parts with a perfect surface finish?

Over the past five years my team have used this secret 3D printing “bible” to help just over 1930 customers personally, one-on-one, hand-holding them to improve their 3D prints.
Those people now get consistent results from their printer.
Whether that’s rectifying some ugly fault, improving printability, reliability, speed or strength, reducing waste or just tuning for absolute perfection on their 3D printer.
I’ve used it to assist people with printers worth $99 to multiple setup $5000+ machines.
I’ve used it to help people printing across multiple areas including:

RC Models

Prototyping
& Mold Creation

Architectural Models

Dioramas & Miniatures

Business

Children's Toys
& Many Other 3D Printing Applications
This 3D printing “bible” takes the stress away from troubleshooting & tuning your printer. It lets you accelerate your success to achieve those perfect prints that before you’d only dreamed of.
The best bit? You can watch along as we’ve structured this 3D printing “bible” into an easy to follow video course with complementary written guides and PDFs.
It’s a system that assumes nothing and covers everything needed, but nothing more.
No fluff, no waffle.
Today, I want to show you exactly how I do it.

Hi, I’m Ed Tyson, the author of The Ultimate Beginners Guide to 3D Printing and the founder of The Institute of 3D Printing.
We’ve created a complete course; a series of modules containing videos for each step of the processes we take every time we see a new printer setup, to get things running and calibrated systematically without fail.
Complete with (downloadable & printable) worksheets, checklists and a ton of bonus content never shared before.
This course covers the good, bad and ugly of achieving that perfect print.
We’ve honed in on precisely how to navigate the most difficult elements of 3D printing.
- Where do you begin?
- How exactly should you setup your printer?
- How do you diagnose and troubleshoot prints, fast?
- How can you fine tune for outright perfection?
It’s all in there – with detailed walkthroughs taking you step by step.
Thinking about it, I have no idea how we managed to print anything half decent before we created the “bible”.
There are just so many variables. It was like reinventing the wheel each time a new printing problem arose.
My almost endless nightmare of ever-failing, ugly prints
Even after buying my second printer, I still got awful prints.
Not every time, they were only terrible sometimes.
The other times they might finish OK but there’d be major imperfections.
Or the infill spongy and weak.
Or the base had warped.
Or some layers were a little out.
Or <insert one of a million problems here>.
Usually I could muddle my way through fixing a problem, some of the time. Other times my attempts to research the problem just led down a never ending rabbit warren of dead ends.
It feels like you’re the only one experiencing that problem.
You research around and find similar problems, but because there are so many variables you know your problem is going to be slightly different to theirs, which means a slightly different remedy.
Or those nearly-there prints. They’re the worst. The print nearly finishes right; it’s going so well for most of the time.
Then your heart sinks as 20 minutes left on a 13 hour print it skips a layer and BANG - it looks like crap.
The truth is...
3D Printing Failures Cost You Money
A 3D printer is literally one of the most powerful tools at our disposal.
If you don't get results soon, you risk getting seriously demoralised and left with your printer sat there on your desk, collecting dust - like a glorified high-tech paperweight.
Break the cycle and stop taking that filament you paid good money for just hours earlier and converting it to scrap plastic, every other print.
Think about it, how much do printing failures really cost you? If just 1 in 3 fail, that might "only" be $10-$20 worth of filament a month - but how many hours have you sunk setting up and head scratching?
Hours that could have been spent earning money, with family, friends or doing whatever else you love?
It really makes you feel like you’re failing, like you’re on your own. And I bet you’ve felt the same. I know this is true, because you’re still reading this, aren’t you?
Looking back, I now understand why I felt that way. I had two problems:
-
I didn’t fully understand the concepts involved and how they all relate together.
What are the key things you need to setup right, that if you don’t will prevent you from ALL chances of success?
What settings actually affect what result?
How should you setup for different types of printing?
What should you check over? – The problems you don’t know to look for.
I just didn’t have a proven, methodical system to work through – that would have saved me so much time and failed prints.
So I winged it. And so I always got mixed, unpredictable results.
Getting angry at the printer.
Getting angry at myself.
-
I was too afraid to find the solution.
I didn’t want to look like a moron, by asking for help on something that might have been so simple.
Or worse, finding a really complicated answer to a problem and not fully understanding it.
I thought “I’m a pretty technically minded person; I should be able to sort this on my own”.
How hard can it be?
I had no idea back then, that trying to learn all this stuff by myself, without a solid structure and feedback on my progress from a professional was a very hard route to take.
Even when you’re getting some success, how do you know if your prints are as good or as strong as they can be?
Those light bulb moments someone tells you something and you just wish someone had told you years earlier.
But what do we do? We hint print and ‘hope’ for the best. We hope the print will finish OK, or if we’re feeling particularly confident we even hope it’ll finish nicely.
Contrast that with now...
Back then I used to dread starting any print, especially if it was a little more complex and even more so if it was a different material to what I was used to.
It really sucked the fun out of things when that first layer would be underway and the anxiety would start to sink in.
All that effort hinging on uncertainty.
Not these days.
When I set a print off now; I just load whichever perfectly tuned printing profile I need, slice, load it to the printer and click print. Then make a coffee while everything heats up.
Sure I usually just watch the first 10 seconds of the first layer, but then I’m free to do other things – checking up now and then but without any real concern.
When I get back, even after a long print – they layers are all good, the finish quality is great, there’s no warp, no stringing, it didn’t fail at any point.
I’m getting predictable results each time, and it’s fantastic.
It’s fantastic because I’m not a slave to my printer. I can do other things, like designing better models or finishing off other projects.
I’m not struggling to reverse engineer some fault from a multitude of potential causes.
I’m not feeling frustrated because it’s an otherwise perfect print, except for this problem.
3D Printing masters know that 98% of the work is done before you even press print. And because they know they’ve done the right setup (for the right reasons) they end up with the right result, predictably.
They’re not reactively guessing, muddling through a million variables.
They know that’s like trying to eat soup with a fork.
Everything’s a struggle because you’re doing things the wrong way round, randomly.
But they own the process which takes those variables away.
But nobody teaches us this! They give us advice like just “increase retraction”.
Often you don’t even get any figures to get you started.
And no one tells you stringing can actually be caused by one of 6 issues, and even if someone’s told you ALL 6 possible causes (all varying in significance between materials), you’re not going to know which the culprit is without systematically working through each one while leaving the other settings the same.
That means traditionally you'd have to make 6 near identical test prints just to get your answer for that one instance.
Who has time for that?
What you need is someone who knows the path, and the pitfalls to warn you of beforehand. Someone who says “In this instance, just start with X and increase X to this.” – they’re giving it to you on a plate, without gaps.
Without leaving you wondering, or afraid to ask for those missing pieces that don’t make sense.
How do you learn to 3D print perfectly & consistently?
I’ve been 3D printing for 6 years. My team of experts collectively have over 28 years of experience across a total of 59 different 3D printer models.
During that time I’ve written countless guides on our rigid.ink help centre, published books and extensive PDFs.
These materials have been read by and helped just over 1 million (1,048,322 to be pedantic) readers to date, from all around the world.
While I’m proud of this, what’s an even greater feeling is my team personally assisting over 1900 people who directly reached out to us with a 3D printing problem and we’ve held their hand providing specific instructions until the issue was resolved.
I'm telling you this not to brag, but to illustrate our knowledge is assisting people like you get better results with your prints.
We’ve seen it all. We know what works and what doesn’t.
And until now, the only way to gain 28 years of 3D printing experience was to spend a lot of time (28 years?) “working it out” through trial and error.
Picking bits up here and there, but mostly just seeing what works and what won’t.
This is learning the hard way.
One problem of learning from trial and error is that you first need to know what definitely didn’t cause the fault.
I don’t recommend that, though you’re welcome to try.
A better suggestion would be to learn from those who really know what they’re doing already.
Here’s how most people try to achieve 3D printing mastery:
- Read up a little and ‘have a go’.
- Become confused at the fault they’re getting or why it’s not
working at all.
- Maybe watch a couple unconnected Youtube videos featuring “similar” problems.
- Desperately ask strangers on a forum for help.
One issue is those Youtube videos are making a lot of assumptions because of so many variables. They don’t cover enough detail, they don’t offer enough troubleshooting advice.
And fundamentally the issue with troubleshooting is you’re always working backwards. When you know what you’re doing before you setup, your time spent troubleshooting drops dramatically.
The next issue is asking strangers online for help. While their responses are often well intentioned, there are two key problems to this.
Here are the problems with asking strangers
on forums for help:
-
They don’t know your specific situation, so can only give unspecific or generic advice.
They don’t know how you’ve already set everything up before this point, so often it’s a rough guess at best.
By the time you follow up asking for more details, they’ve gone or lost interest - you just hear crickets.
-
You likely can’t even tell who's speaking from real experience.
Everyone seems to have an opinion online – and there are plenty of people who don’t have a clue themselves, regurgitating answers they heard elsewhere.
How are you supposed to cherry pick the few gold nuggets over the masses of poor guesses?
It’s this lack of solid information and a clear route forward that keeps you locked in a cycle of poor results.
A GOOD way to learn is to read all of these well known 3D printing titles and take thorough notes:


Over the years I’ve read these and a ton of other 3D printing books. A lot of them are great and there’s a good deal of information in there.
But there was a very similar problem to a lot of the other information out there.
Things just weren’t specific or detailed enough, with the full picture, in the right order.
Many of these books, while making excellent introductions are just too vague to provide the level of assistance required.
A BETTER way to learn: Get the correct setup procedure for your printer, so you know things are correct and get to peer over an experienced 3D printerer’s shoulder while they tune and tweak for various prints.
Troubleshooting for reference on the fly, explaining everything as they go so you get the full methodology, in the correct order, and logical explanations with all the relevant resolutions alongside.
I could give this to you now of course, but I want to go better and quite a bit deeper than that.
Because I know the BEST way to learn is this:
- Watch the entire process of a printer being setup correctly, from start to finish, step by step & easily followed.
- Be guided not from one person who “knows quite a bit” but from a fully-fledged team of verified experts at your disposal, who’ve methodically planned out the whole process. They're not repeating some BS they heard someone else talk about.
- Get detailed instructions for if X then do Y. Understand how everything ties in with each other.
- Make sure the people you’re learning from have made mistakes as well as great successes and have experience across a wide selection of machines. So they can give you the warnings of what not to do, too. You want to learn from those with a varied background.
- See how those experienced experts hit and actually respond to the problems that do arise so the same issues don’t hold you back.
- Most importantly of all, get on-going, direct feedback from those same people to help you with your prints and suggest incremental improvements specific to you.
It's this new way that I'm so excited to share with you today.
Introducing...
Our 3D Printing Mastery Training Suite
Our promise: Become the master of your 3D printer and start getting perfect prints, 100% reliably.
Save money on failed prints. Save your time endlessly tinkering. Save your sanity.
This is our brand new training and mentorship package designed to accelerate your 3D printing results, without hassle, head scratching or frustration.
Follow along as we show you how to correctly setup, operate and troubleshoot your way to 3D printing success.
Designed for complete beginners and up.
"Where do I even start?" - We never begin a print until the bed is truly level and these main 3 areas of the printer are correctly configured.
"What effects what?" - We strip back the common nonsense misconceptions and break down exactly which parameters directly (and indirectly) effect each other.
"How can I improve reliability?" - Discover the 4 hidden reliability killers lurking in your existing setup and how to fix them before they ruin your next print. Turn your printer into a rock solid, 100% reliable and productive tool.
"What do all these slicer settings mean?" - Unlock your printers true potential by understanding the vast arsenal of clever slicer features you didn't even know about.
Like reducing printing time while improving part strength AND reducing material usage. It pays to really know your way around the software.
"How do I improve finish quality?" - Now you have a reliable machine, you'll get access to our formula for fine tuning the surface finish of your prints so they actually look professional and whole lot less "3D printed".
"How should I troubleshoot problems if they arise?" - While following our correct setup will pre-emptively stop 95% of the issues you'll face, you may still need to troubleshoot occasionally.
Learn what to do and exactly how to do it, or just ask your expert mentor who will personally guide you through your specific issue.
And those are just a couple of features.
Inside the training suite, you'll find The Complete, Confusion-Free Guide to 3D Printing Mastery video course.
It includes 6 in depth modules, each 4-5 episodes long that include videos, PDF worksheets and checklists delivered each week to SHOW you exactly how our secret 3D printing bible works.
Here's a sneak peek inside the video course:


Here's just a taster of what you'll learn in The Institute of 3D Printing Training Suite:
-
A level bed is paramount to your success. We show you the virtually unused technique to get your bed perfectly trammed and level (even beyond what automatic bed levelling can do). Often new beds don’t stay level, so find out how to keep yours working perfectly without re-levelling.
-
Learn all 6 causes of stringing - so you can banish it forever. Remedied step by step in our master stringing & blobs guide. Full guide on retraction included.
-
Increase strength, stop printing fails and use less filament by chopping up and reorienting prints on the bed. Doing it wrong causes a ton of extra work for yourself. But follow our simple method and you’ll never print the same way again.
-
Do you currently use Cura, Prusa Slicer, Simplify3D, or just not sure which to learn right now? We’ve created an Advanced Slicer Mastery course for each and explain which you should pick for your 3D printing goals.
-
Find out the $16 dollar printer upgrade that ensures effortless print removal every time, and which upgrades are just gimmicks.
-
Ever wanted to master the fine art of printing thin walled and fine detail prints? Discover exactly how to do them reliably in our complete guide.
-
Use our advanced “Cobweb Method” for fine tuning already good prints, to get those viral-worthy, almost ‘manufactured look’ level of prints.
-
And so much more...
Follow along, step by step as we setup the printers to be perfectly reliable and configure the settings for beautifully finished prints, and so much more.
This is not a couple of unrelated videos covering some of the information you might need. Or a book or two on 3D printing tips.
You can find those anywhere.
We wanted to cover everything, to show you the entire process the way it should be done, in the correct order.
Imagine how much you'll learn from following our experts explain in detail everything you need to know, while dispelling the myths.
Here's what's covered just in the core video course:
(there's a whole lot more, but I don't want to overwhelm you).

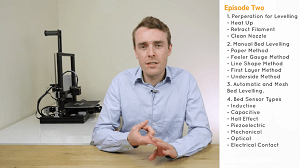
Module 1:
Perfecting Bed Levelling
Lesson 1: Why Is Bed Levelling So Important?
Lesson 2: The Right Way To Level Your Bed
Lesson 3: How To Know Your Bed Is Truly Flat
Lesson 4: Bed Mounting Types Explained

Module 2:
Getting Prints to Stick Every Time
Lesson 1: Removable Bed Surfaces
Lesson 2: Fixed Bed Surfaces
Lesson 3: Adhesion Helpers
Lesson 4: Improving Adhesion

Module 3:
Optimizing Temperature & Cooling
Lesson 1: Perfect Nozzle Temperature
Lesson 2: Correct Bed Temperature
Lesson 3: Tuning Object Cooling

Module 4:
Slicer Print Optimizing
Lesson 1: Choosing Layer Height & Line Width
Lesson 2: Walls, Bottom & Top Layers
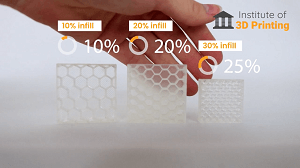
Lesson 3: Adaptive Infill: Patterns, Density & More
Lesson 4: Retraction Settings, Length & Positioning
Lesson 5: Retraction Settings Advanced
Lesson 6: Supports - Basic
Lesson 7: Supports - Advanced
Lesson 8: Mass, Speed & Timing Considerations

Module 5:
Smart Print Orientation
Lesson 1: Reducing Supports
Lesson 2: Reducing Bridging
Lesson 3: Orientate & Segment For Strength
Lesson 4: Orientate & Segment For Improving Finish

Module 6:
Troubleshooting & Further Improving Prints
Lesson 1: Identifying Visible Issues & Ramifications
Lesson 2: Resolving Those Issues
Lesson 3: Identifying Less Obvious Issues & Resolving
Lesson 4: The "Cobweb" Method For Fine Tuning
If you hired me and my team to come out to setup, configure and optimise your printers - that's how we'd do it.
If we sold the above modules outright as a stand alone course, we'd have to charge $497.
That's no word of a lie, and while I'm not going to charge you anything like that amount (not even half, or even close to a quarter of it...) I need you to understand the value within.
The modules above cost us $10,000's to produce. That's because at no expense spared, we built it to have maximum value to our attendees.
But that's not all.
Also included in the Institute of 3D Printing training suite is our
Advanced Slicer Mastery Course
A combined 3 hours 52 minutes of easy to follow videos showing you how to use every feature of your slicer. Pick and choose what interests you, or become fully competent in all the features available.
At the basic levels, you'll learn:
- Full walkthrough, including deep explanations on each tab
- How to select and adjust Layers, Infill, Extruder settings, Cooling, Speeds & More
- Choosing perimeters & top & bottom layers
- Adding a new filament with settings
- Object positioning & duplication
At the more advanced levels you'll learn:
- All about Advanced mode (if your slicer has it)
- Support strategies and positioning
- How & why to use Processes (like Sequential Printing)
- & Much more
Currently covering Cura, Prusa Slicer and Simplify3D in significant levels of detail.
It’s updated periodically as new slicer features become available.
The value of these combined trainings is $297.
You also get access to a ton of bonus content, such as new
Hyper-Detailed Masterclasses
These are delivered each month where we go deep on very specific tutorials.
This is no-theory and covers topics in a hand-holding level of detail. For example the first masterclass you'll have access to immediately after joining covers temperature towers.
You learn why it's important to dial in a temperature tower with every new filament (material or brand) you decide to print with - even if it already looks OK we'll show you the 2 most important qualities to look for when crafting your printing profiles.
We show you which tower STL to use (we provide a specially designed one for members) and show you exactly how to set it up ready to print, in each of the 3 slicers covered.

Then once printed, you compare your temperature tower to ours. We explain exactly what to look for and how to tell what adjustments lead to what outcomes.
Because you're only tuning one aspect with each tower (in this case, temperature) you can tune your printing profile very quickly. Often in just your first tower.
But it get's better - because once you've printed yours, take a photo and let our experts guide you to fine tuning your profiles even further. This level of support takes the guesswork away and ensures you never "fall behind" not knowing where to go next.
And this is just one example deep dive masterclass of many.
And our members-only podcast where we interview masters of their field, mining their best tips. Perfect for those with busy lives to learn on the move or while doing other things.
And finally, I'd like you to think about the last time you were really frustrated with your printer. You just couldn't resolve the fault, or it took you hours, or even days to move past it.
Ask yourself how much you'd have paid for a fully knowledgeable 3D printer technician to lead you through each and every 3D printing issue you had, or still have?
Fast-tracking all those hours of head scratching and frustration and just telling you exactly what you needed to do for your situation?
To have an advanced technical support specialist on hand whenever you needed them, think about how much you'd have to pay for that kind of mentorship.
$100 for a single consultation? Perhaps $50 a time if you had a regular discount?
Well, you're also getting...
Unlimited 1-on-1 Technical Support
Personal help from an expert on standby is included any time you run into trouble, or just have a technical question - for free, as a member of the Institute of 3D Printing.
And when I say unlimited...
I mean unlimited. Ask them as many questions as you like, as many times as you need until you get results.
They act as your mentors.
And getting their assistance is easy. Just send them a photo of your print and some settings (or a screenshot of your slicer for speed) and they'll respond with detailed step by step instructions to improve.
You see, the Institute of 3D Printing isn’t just a course, or even a bundle of courses.
It’s a complete results acceleration program.
In all honesty, it was this unlimited technical support I nearly left out of the program due to the sheer cost of providing it. But we all decided it was such a crucial element to our members success we had to include it, even at this price.
As a member of the Institute of 3D Printing, you get access to all these courses, bonus content and unlimited access to your own private team of 3D printing experts who actually care. They're here to act as mentors, there for you to guide you through any 3D printing issues.
Why reinvent the wheel each time when we have people ready and eager to help you?
Here are some real examples of how our experts have helped 3D printerers just like you
-
I reached out to support hoping for a couple quick tips. What I got was support simply far and away better than any other company I have ever dealt with in my 30 years in manufacturing.
Susi held my hand from start to finish recognizing my misguided settings, predicting potential issues, and offering a multitude of helpful advice.
Her patient approach to continue working the issues was much appreciated and, I’m happy to say, eventually resulted in my first draft of the part being a success! "
Bill Martin
-
...with a clogg (in a 0.25mm nozzle) I had to spend an hour taking Prusa apart and cleaning it out.
After I'd had some brilliant advice from Stephan in support (second to none) I was back up and printing and the results were amazing!"
Stephen Boyd
-
I was thinking the same thing about retraction, so I printed one of the bushes I drew up and gave it a 1.2 wall, looks spot on.
Thanks to you guys for your superb customer back up the problem was sorted.
Thanks for your help with this! "
Ashley Parker
-
I have been very pleasantly surprised by the lengths gone to on my behalf, way beyond any expectation or requirement.
Susi has been happy to help me with my machine setup (even down to supplying a sample FFF), strategies and informing me of new methods of achieving the part and the finish I require.
Being an engineer, she brings a reality to the logic needed to get results.
I cannot thank you enough for this support, it has brought my 3D printing to a new level that I could never achieve in isolation. "
Marcus Dixon
-
I think we might just have cracked it!
I realise it’s hard to convey much detail in pictures but the attached print is absolutely perfect.
I also realise it’s hard to get excited about someone else’s print but I just wanted to say thank you and it seemed the best way. "
Rafe Aldridge
-
Hi-ya Susi,
You were spot-on with the too close diagnoses. I lowered the bed 1/4 turn (pic 1), then a further 1/8th (pic 2) and the ‘fluff’ has gone.
I also reduced both the layer height and width to your recommendations.
Thank you for your help!"
Reece Jones
-
Hi-ya Susi,
You were spot-on with the too close diagnoses. I lowered the bed 1/4 turn (pic 1), then a further 1/8th (pic 2) and the ‘fluff’ has gone.
I also reduced both the layer height and width to your recommendations.
Thank you for your help!"
Reece Jones
-
...I hope that you were on the night shift for other time-zones and not working late/early!
I uploaded these photos yesterday to the Facebook page (under a comment made by Paul Clark). These were using the settings you gave me on the right (obviously).
The tolerances are great and this is exactly what I was hoping to achieve 9 months ago! "
Shane Ward
Some FAQs on the new way to 3D print
-
There's loads of videos and books on learning to 3D print. What makes the Institute of 3D Printing training suite different?
I love some of the books and video content already put out there on 3D printing.
Though since reading and watching these, configuring many 3D printers and writing many of my own guides on specific topics - it was clear no where provided the full picture, in the correct order and in sufficient detail.
I want to show you everything, from start to finish, so there's no confusion.
Learning 3D Printing is a very visually intensive exercise. Many of the concepts and how-tos simple cannot be (nor have been) sufficiently explained in a book.
You need video to illustrate these points in detail.
-
What if I'm not very technically minded?
Hey, I get it. 3D printers are now increasingly being adopted by more and more people in all walks of life - they're now seen more like another tool in your toolbox, like an electric drill rather than a pursuit in itself.
In preparation for this, I wanted to ensure the Institute catered for complete beginners with even limited knowledge of technical concepts.
Everything’s explained simply and easily. We don't baffle with jargon or "engineering talk".
If you knew enough about 3D printers to buy one, or be in charge of one - you'll do fine with the processes and concepts we breakdown.
-
What if I'm not a hobbiest, does the Institute work for those printing for business or education?
Yes! The strategies we outline work well for all types of FDM (or FFF) 3D printers at a multitude of price points.
Businesses can't afford down time, they need reliable, predictable machines the most.
Educational institutions need a solid reputable source of information to work from.
-
How do I know if I need this course?
Have you hit any of these problems when trying to 3D print:
- "Where do I even start?"
- "Wondering what settings effect what?"
- "How can I improve printing reliability?"
- "What do all the slicer settings mean?"
- "How do I actually improve finish quality?"
- "How should I troubleshoot X?"
If so, The Institute of 3D Printing will help you.
-
What if I don't have a 3D Printer yet?
If you’re awaiting delivery or you’ve not chosen your printer yet, you have a unique advantage with the Io3DP.
Because you can get trained up and learn the ropes in advance, you’ll be fully ready to dive into printing when your machine arrives.
It won't be scary - you'll have your plan of action.
This will dramatically reduce your time spent on the wrong things.
You’ll even pick up some great tips on what features to look for and recommended upgrades that will make life just that little bit easier.
-
How long will the courses take to complete? How soon can I expect to see results?
We've been mindful of people's time, so we've compiled the course in a concise, yet comprehensive fashion. It's not longer than it needs to be.
Most videos are easily digestible being just 10-20 minutes long, and the core course videos are delivered weekly so you can follow along in order.
We expect that to watch, read the accompanying content and actively follow the information with your 3D printer, you'll want to spend 1-2 hours on this per week. Less is fine, but you'll get out of it what you put in.
If there's any topics covered later down the line that you want to get stuck in with straight away, just ask the experts to take you through it.
You can do this from day one - you don’t have to wait to get their help, so you can start getting the issues you want resolved now, dealt with straight away.
Once each episode is delivered, you can watch it any time you wish. As soon as you join you'll have access to over 3 hours of video content: the first 3 lessons of Module 1, all the Slicer trainings, the masterclasses and the podcast episodes.
It is plenty of content for those that like to get stuck in and binge on, but we’ve ensured it isn’t overwhelming to those who prefer little and often!
The Institute of 3D Printing is right for you if...
-
You're ready and willing to put a little bit of time in to get massive gains in your 3D printing results.
-
You are fed up with print failures, or all those annoying imperfections and you just want a reliable printer.
-
Your prints are OK but you know they could be better. You want to unlock the full potential of your machine.
-
You want to learn from those who actually know what they're talking about and already personally helped over 1,900 people just like you, achieve the predictable, impressive results you're looking for.
-
You're in it for the distance. You're tired of unconnected "tricks and tips" that don't really work and you're ready to take your 3D printing to the next level.
If you’re ready, I can show you the secret bible we use to guide our members to creating perfect prints, time and time again.
My invitation to you...
Try the Institute of 3D printing on me. Get a full 14 days access, for FREE
We’ve put everything into the Institute of 3D printing, and I want to make sure you see that AND start getting results before you pay a penny.
Try the courses, the bonus content, the slicer trainings and even get your 1-on-1 expert help.
That’s because the Institute is all about YOU getting results. That’s the goal here, and to help the most people I can, I need to make it accessible.
That’s why I want to invite you to take the suite for a test drive at my expense, not yours.
No risk. No tie-ins. No contracts.
If after you’ve sampled the Institute you don’t LOVE it, I urge you NOT to pay. You can cancel before the 14 days are up, and you won’t be charged.
You can cancel easily, at any time (call us, email or just click from within the members area). It's that simple.
All I ask, is that you really dive in and experience all the membership has to offer. Reach out to our friendly experts, take notes on the training, really get some solid value from the Institute during your trial.
That way even if you choose to cancel you’ve at least got something useful from it.
And after the 14 days? If you ever want to cancel going forward, you can do at any point. You’re not tied down and can leave any time you wish.
Our motivation to keep you a member should purely be through wowing you with the service and materials we provide and never through underhand ‘contractual’ agreements.
Exactly What You're Getting...
-
Every week you’ll have access to completely new content and trainings on a host of various subjects within 3D printing taught by our highly experienced 3D printing experts.
-
You’ll have access to our ever-growing library of masterclasses. Deep-dives on the specific technicals shown step by step in an easy to follow way.
-
Exclusive access to our experts who answer all your 3D printing questions in-depth, provide step by step answers and won't get bored with all your other questions! Tap into their vast experience, and let them mentor you to better 3D prints.
Get access to the Institute of 3D Printing today
Including...
-
The Complete, Confusion-Free Guide to 3D Printing Mastery Course
-
Our Hyper-Detailed Foundation & Advanced Slicer Trainings
-
In-Depth Step by Step Masterclasses
-
Bonus Content Including Members-Only Tools & Hard-to-find Resources
-
UNLIMITED 1-on-1 Technical Support From Our Experts
And my gift to you...

AND get to keep it EVEN if you choose to cancel...
FREE For 14 Days
Then just...
$27 / Month
Cancel easily, at any time.
Get instant access even at 2am - Guaranteed.
Or pay annually, skip the trial and save $54
If you have any questions or concerns about the membership, call or email us. We’re more than happy to assist.
+44 (0)1937 589 052 (Mon-Fri 9-5, UK time)
success@io3dp.com
"Can I Afford It?"
The real question is, can you afford not to do this? How much more time and filament will you waste before you get the results you deserve?
Imagine the confidence to be able to click print, and come back to a perfectly finished model - without "hoping" it will finish. What is that worth to you?
Think about how much you paid initially for your printer - you'd be loosing twice if you didn't use it to it's potential.
The beauty of this program is you can just join for any amount of time you need to.
And you're not tied in, once you're getting the results you need, feel free to part ways - we'll be sad to see you go, but thrilled we could turn your printing around for you.
Frequently Asked Questions:
-
What specifically will I learn from this course?
You'll discover our exact methods for the correct setup of a 3D printer, troubleshooting and fine tuning procedures so you can get perfect prints, every time.
Sure, we get technical, but it's explained simply and methodically throughout, so there's no confusion.
-
Which 3D Printers is this course relevant to?
This course is relevant to all FDM (or FFF) 3D Printers. That's any printer that uses plastic filament as the printing material.
The course is not suitable for DLP (Resin consumable) or SLS (Powder consumable) based printers at this time.
-
If I'm having trouble on the course, can I get help from a specialist?
Yes! This is a key part to the whole training suite. Our expert's are going to work with you to coach you through to the results you want.
Ask them unlimited questions about printing, the course, any other aspect of 3D printing, or just send them photos of your prints asking for advice - they're there to work with you closely.
-
How long is the course, what happens once this is complete?
The course spans 6 modules, each module consisting of usually 4 lessons (some more, some less). You'll be able to access a range of lessons and bonus material immediately after signing up.
Approximately one lesson of the actual course content is added each week. You won't have to wait to complete the course before you start seeing results - that's what our expert community is for.
After you've completed the course, we'll continue to release more useful & highly actionable 3D printing content, for as long as you choose to remain a member.
-
If I'm not satisfied or don't complete the course, can I get a refund?
You can cancel within 30 days for a complete refund with our no-hassle money back guarantee. After those initial 30 days have passed, you are not able to get a refund.
On the monthly plan (billed once per month) you can cancel at anytime, although you will not receive a refund for payments made after the initial 30 days.
-
How much time does the course take?
To watch the videos and carry out the steps, you'll want to set aside at least an hour per week, but we recommend more. You'll get out of this what you put in.
If you ever get stuck or just want some guidance, you have your community of experts on hand to assist with your questions. So you don't spend days agonizing over something that they know how to do in 10 minutes.
-
Who created this course and why are they qualified?
This is no one-man-band. This course has the entire technical support team from the Io3DP behind it.
Cumulative decades of 3D printing experience, structured in an easy to follow step by step course.
Modules are taught by our hand picked presenters with real experience - so there's no theory-only or guesswork.
-
Is there a course certification available?
We are working on making a test available to allow a certification of completion to the course for an additional fee.
This is in progress and you'll be notified when this is an option to obtain your certificate of completion.

+44 (0) 1937 589 052
success@io3dp.com
© Copyrights by The Institute of 3D Printing, trading name of rigid.ink Ltd.
All Rights Reserved.
© Copyrights by The Institute of 3D Printing, trading name of rigid.ink Ltd.
All Rights Reserved.